 1252
1252
Ringing sales or making returns shouldn't require you to have to move all around the shop, move to a different register, or use a different device. Complete sales and returns with ease and all on one device with KlickTrack's register app. You can quickly navigate to a section in this article by using the links below:
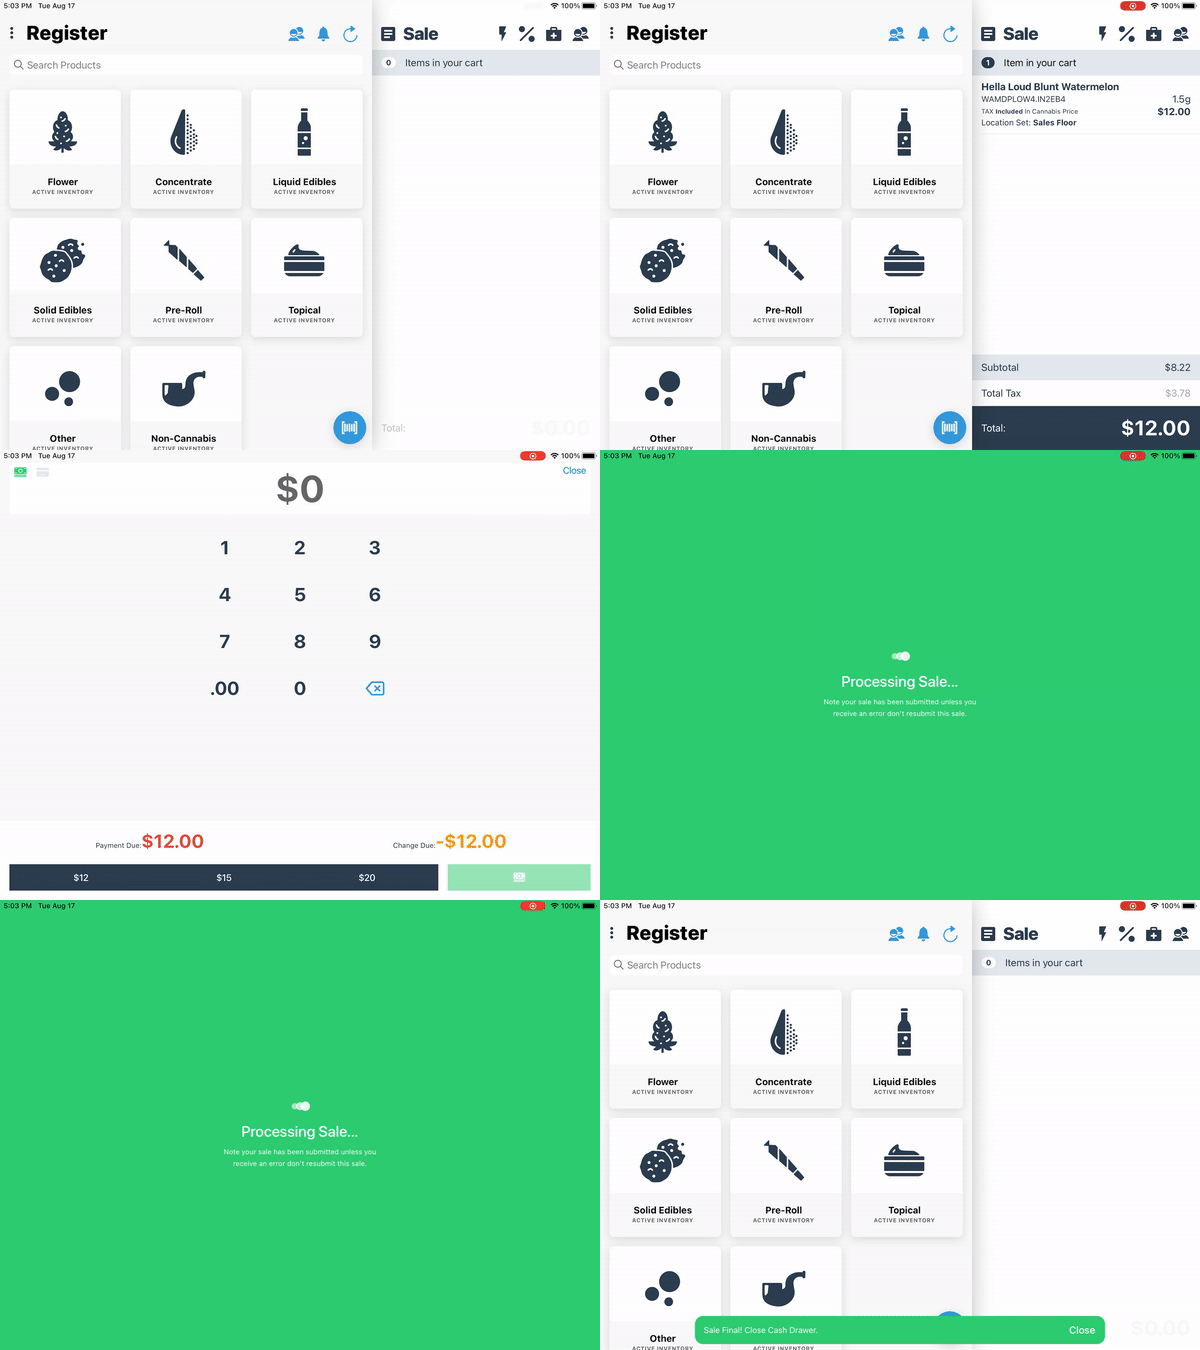
1. Ringing Sales - Cash Payment
- Add a customer to the sale (if applicable).
- Scan items to add them to the cart.
- Apply loyalty points (if applicable).
- Apply discounts (if applicable).
- Select "Total".
- Select Payment Method (Cash).
- Select the correct denominations or enter in the amount the customer is paying.
- Select the green dollar to complete ringing up the sale.
- Select "Done" to return to the cash register.

2. Ringing Sales - ACH Payments
*Note: You must first sign up for ACH payments with KlickTrack before you can enable the tender type.
- Add a customer to the sale (if applicable).
- Scan items to add them to the cart.
- Apply loyalty points (if applicable).
- Apply discounts (if applicable).
- Select "Total".
-
From the payment method screen, select ACH Payment.
-
Review the total + surcharge.
-
Confirm the accuracy of the customer’s details, and adjust on-screen as needed.
-
Select Send SMS Paylink to Phone Number. This will trigger the customer will receive an SMS with a link to complete their ACH payment
-
While the customer completes their payment process, you can check the payment confirmation status or cancel the ACH payment process.
-
Once the customer confirms their payment was successful, select Check for Payment Confirmation.
- Select Done to close the screen and return to the register homepage.
3. Completing Returns at the Register
- Select the 3 dots to open the Control Panel.
- Select "Sales & Returns".
- Enter Sale ID into the search bar or select the Sale ID that needs to be returned.
- Select the Sale ID.
- Select "Return".
- Select the "+" to increase the quantity of the item that is being returned (as needed).
- Select the red return bar to complete the return.

4. Register FAQ
Why isn't a back-end adjustment showing at the register?
- If an adjustment made on the backend is not showing on the register, the register needs to be refreshed.
- Refreshing the register by using the refresh button on the main KlickTrack register page will make sure your device has the most current data available.
I am trying to do a sale and it says I have to scan everything. Is there a way around this?
-
The reason you are having to scan every barcode at the register in order to sell is because of an App Setting that is currently toggled on called Reverify Cart.
-
When enabled, the Reverify Cart feature requires users to rescan items in the cart prior to transacting to ensure that the correct SKU is being sold for inventory control.
-
This feature requires verification of all barcodes in a cart to complete a transaction when enabled.
You will need to turn this feature off to allow you to sell items without scanning every barcode. Here are some steps to help with this:
- Select the three vertical dots at the top left corner.
- Select App Settings.
- Enter Manager PIN.
- Navigate to the Register Settings section.
- Toggle off Reverify Cart.
- Select Save.
Once this is complete, refresh your registers and you should be able to sell products without scanning to proceed.


