


 2098
2098
Whether cannabis or non-cannabis, all inventory must be entered into KlickTrack via an inbound manifest. As non-cannabis items are typically not sent over via a manifest, you'll want to create one in the Inbound Manifest section on your KlickTrack Dashboard.
Video Overview
Best Practices for Non-Cannabis Inbound Manifests
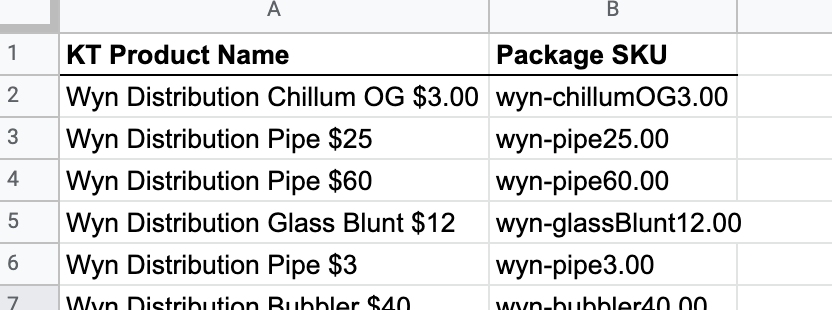
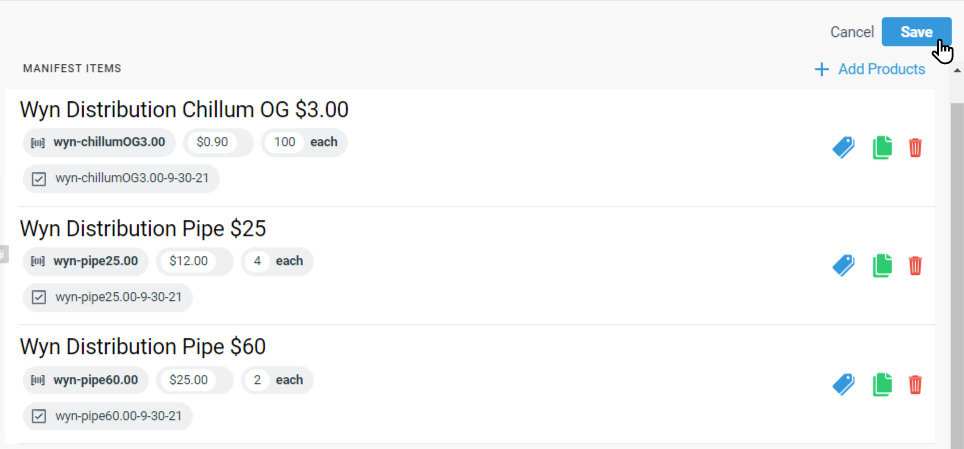
Use the same Package SKU per KlickTrack Product
-
If the product consistently comes with the same barcode sticker, always use that item number.
-
For un-stickered products, create a specific format that can be easily followed every time.
-
Suggested Format: [vendor abbr]-[product name abbr]
-
Example: wyn-chillumOG3.00
-
Always use that Package SKU for that Product.
-
-
Keep a spreadsheet of Product names and associated Package SKUs for easy copying and pasting.
Use new, unique Purchase SKUs for each batch on a manifest
-
Suggested Format: [vendor abbr]-[product name abbr]-[date]
-
Add -[time] if you’re receiving multiple manifests with the same Products in one day.
-
Example with Date: wyn-chillumOG3.00-9-30-21
-
Example with Date & Time: wyn-chillumOG3.00-9-30-21-8:00
-
Scanning Options
-
Print a label for each un-labeled non-canna Product and create a scannable reference sheet easily accessible to budtenders.
-
Print labels and place the labels on all un-labeled non-canna items.
 Reprinting a label with KlickTrack using my Zebra label printer
Creating an Inbound Non-Cannabis Manifest
In this section, we will be creating an Inbound Non-Cannabis Manifest from Wyn Distribution.
From the KlickTrack Dashboard:
- Navigate to Inventory Management.
- Select Inbound Manifests.
-
Select the blue plus + sign in the bottom right-hand corner.
-
Select Non-Cannabis to create a non-cannabis manifest.

-
Enter Manifest Name and Manifest Barcode.
-
For consistency, and ease of effort, these two fields can be the same.
-
Suggested Format: [vendor abbr][date].
-
Example: Wyn Distribution 9-30-2021.

-
-
Select Vendor.
-
Enter Vendor Name into the Search Bar.
-
Select Can't Find Vendor?
-
Non-Cannabis Vendors do not have an MME and as a result, would not be found in KlickTrack's Vendor Database.

-
-
Select the blue calendar and blue clock to enter the delivery date and time.
- Select the blue calendar and blue clock to enter the arrival date and time.
- Selecting identical times for both delivery and arrival is appropriate as Non-Cannabis Manifest do not require this specific information.
- Enter Delivery Route.
- Entering NA is appropriate for Delivery Route as Non-Cannabis Manifest do not require this specific information.

- Entering NA is appropriate for Delivery Route as Non-Cannabis Manifest do not require this specific information.
-
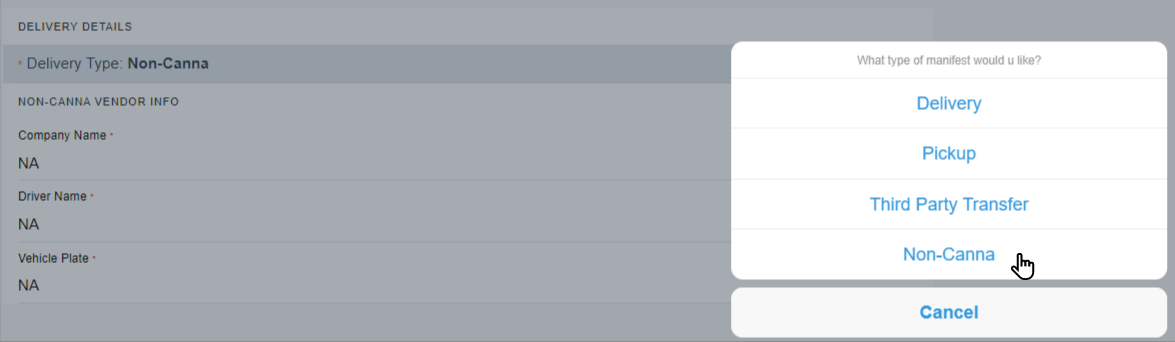
Select Non-Canna as the Delivery Type.
-
NA is appropriate for Company Name, Driver Name, and Vehicle Plate as Non-Cannabis Manifest do not require this specific information..
-
-
Select + Add Products.
-
Enter product name into the Search Bar.
-
Select item.

-
Select Add Package SKU.
-
Enter Item Package SKU
-
Select OK.

-
Select product price ($0.00).
-
Enter product price.
-
Select Add order.

-
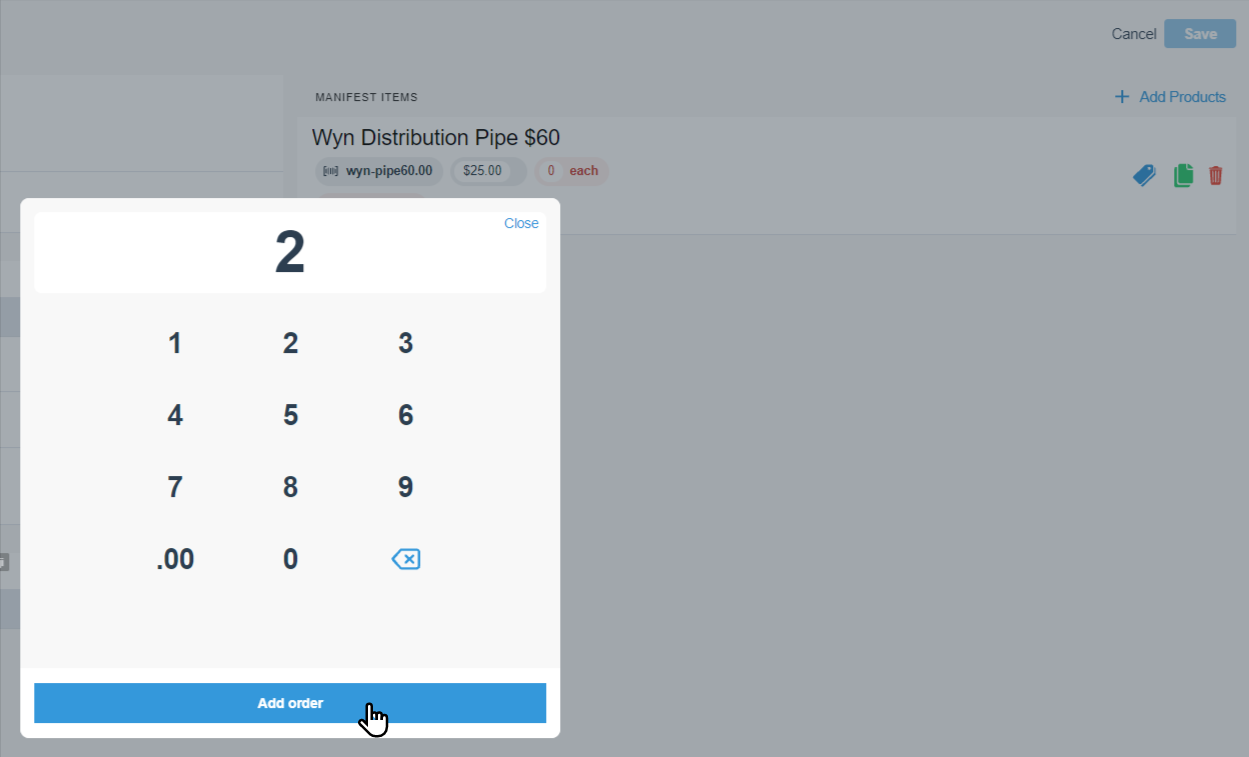
Select product quantity (0 each).
-
Enter product quantity.
-
Select Add order.
-
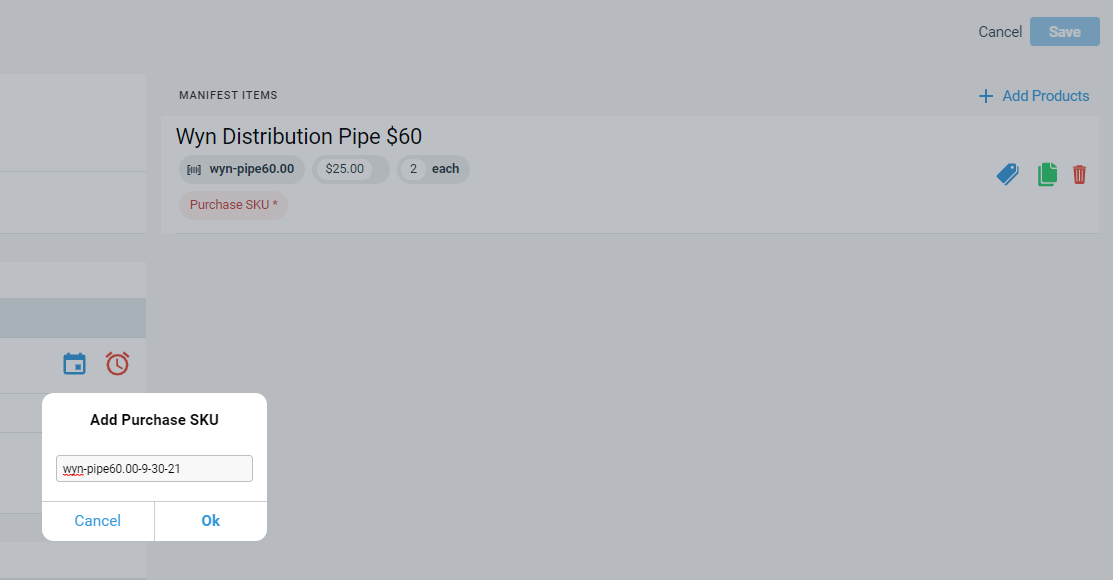
Select Purchase SKU.
-
Select Enter SKU.
-
Enter unique purchase SKU.
-
Select OK.
-
After all the necessary items have been added, receive manifest as normal by selecting Save.
Accepting a Non-Cannabis Manifest
From the KlickTrack Dashboard:
- Navigate to Inventory Management.
- Select Inbound Manifests.
- Select the Non-Cannabis Manifest that needs to be accepted.

- Select Accept Items.


