


 591
591
A transportation manifest is required for transferring inventory out of your location. There are 3 steps to the outbound manifest process:
-
Creating an outbound cannabis manifest in KlickTrack
-
Finalizing the manifest process and removing products from your inventory.
In this article, you will find step-by-step instructions for completing Step 1, “Creating your manifest,” and Step 3, “Finalizing the manifest process.” Information on uploading your manifest into CCRS can be found in a separate article, which is linked above.
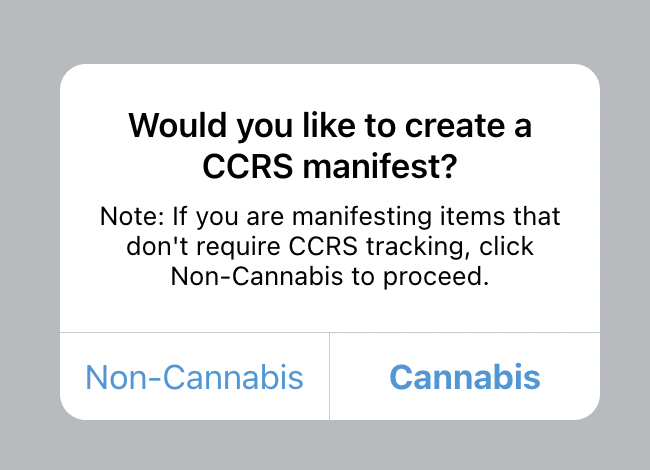
Creating an Outbound Cannabis Manifest
From the KlickTrack Dashboard:
- Navigate to the Inventory Management Section.
- Select Outbound Manifests.
- Select the blue + icon.
- Select "Cannabis" from the create type modal
- Start by entering a Manifest Barcode.
-
For the manifest to be submitted successfully to CCRS, the barcode must be unique and not utilized on a previous manifest.
-
Barcode can be up to 100 alpha-numeric characters in length.
-
- Open the "Origin Details" section using the blue + icon and enter the following information:
-
License #
-
Address
-
Phone
-
Email
-
This is a requirement from the LCB. Once a manifest has been successfully submitted to CCRS, the system will send a confirmation email and PDF to the originating licensee, receiving licensee and third-party transporter (as applicable).

- Open the "Destination Details" section and select the LCB Vendor.
- For accuracy, review the vendor license number, address, and phone number and adjust as necessary.
- Enter a valid email for the vendor. This is the email address CCRS will send a confirmation email and PDF to once the manifest has been successfully submitted.

- Open the "Transporter Details" section and fill in the following information:
- Transport Type (Delivery, Pick-up, or Third Party Transporter)
- *Transporter License
- Note: This field is only required for third-party transports. The license number information entered here must match what has been assigned to the transporter by the state of WA.
- Transporter Name
- Vehicle Plate Number
- Vehicle Make
- Vehicle Model
- Vehicle Color
- Vehicle VIN
![]()
- Open the "Travel Details" section and fill in the required information:
-
Select the Calendar icon to specify the delivery date and time.
-
Select the Calendar Icon to specify the arrival date and time.
-
Enter the travel route.
-
- To add items to your manifest, click the red +Add Items at the top right corner of the screen and search for the desired item(s) by barcode.
- Select your desired item(s) and click "Save."
- Enter the Qty you are returning for each item.
- If you need to add additional inventory to the manifest, repeat steps 10-12. You can delete items anytime by clicking the red trash can.
- Once all your required information has been entered, your screen will look like the image below. Select "Save."

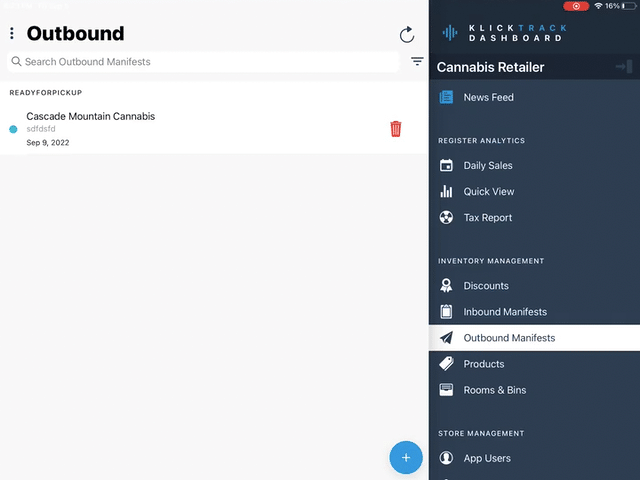
- On the outbound manifest page, you can locate your manifest under either the "Ready for Pickup" or "Ready for Delivery" status. You can access and move between the status filters by clicking on the black-striped triangle in the right-hand corner.
✅ You have now completed step 1, creating your outbound manifest in KlickTrack. Now you need to move on to the next step, creating your compliance outbound manifest in CCRS. (REPLACE THIS LINK) Once you have completed that step, use the instructions below to finalize your manifest.
Completing the Return Manifest Process & Removing Products from Inventory
Once the vendor has physically picked up the product that is to be returned, you need to complete the manifest process:
-
Navigate to the Inventory Management on the KlickTrack Dashboard.
-
Select Outbound Manifest.
-
Select the manifest in question.
-
From the “Select Manifest Action” modal, choose Set In-Transit.
-
You can also download a JSON file for your vendor from this modal, or from the Manifest Print Preview screen.
-
-
Selecting “In-Transit” will:
-
Automatically remove the transferred items from your inventory
-
Move your manifest to the “In-Transit” status.
-
![]()

