 781
781
Any inventory you wish to transfer out of your store will require you to create an outbound transfer manifest so that your inventory can be tracked accordingly.
The steps you need to take to complete the transfer will vary depending on the type of transfer and the status of your inventory. Outlined below are detailed instructions to help you understand the various transfer scenarios and the steps you need to complete the transfer successfully.
Compliance considerations
The steps you need to take to complete the outbound inventory transfer will depend on the type of transfer and the inventory status. We have outlined steps for two different scenarios below. However, before we dive into those scenarios, let's touch on some recommended best practices related to outbound transfers as they will help inform your path forward:
1. Never transfer out a package with historical sales associated with it.
-
If you were to transfer out such a package, you would be unable to edit the sales receipts for any of the sold products. This can create auditing issues and data discrepancies further down the road.
-
You can verify if a package has historical sales in Metrc by reviewing the desired package in the Packages > Active tab.
2. Never transfer out a partial package if you intend to sell the remaining products from the package in your store.
-
Metrc package tags can only exist in a single location at any time, so the moment you transfer the package out of your store, the package tag is no longer associated with your license. Therefore, if you were to continue to sell products from that package, you would not be able to report those sales against your license. This will put you out of compliance and create discrepancies in your Metrc data.
Our recommendation for scenarios 1 & 2 above is for dispensaries to create a new item and a corresponding package tag for that item before creating the transfer. We have outlined steps for this scenario in Option 2 below.
If scenarios 1 & 2 do not apply to your transfer situation, then please follow the steps outlined in Option 1 below.
Option 1: Outbound Manifest creation only
⚠ The steps outlined in this option are only for those transferring out a complete package that does not have sales associated with it. If your transfer does not fit these criteria, please see Option 2 below.
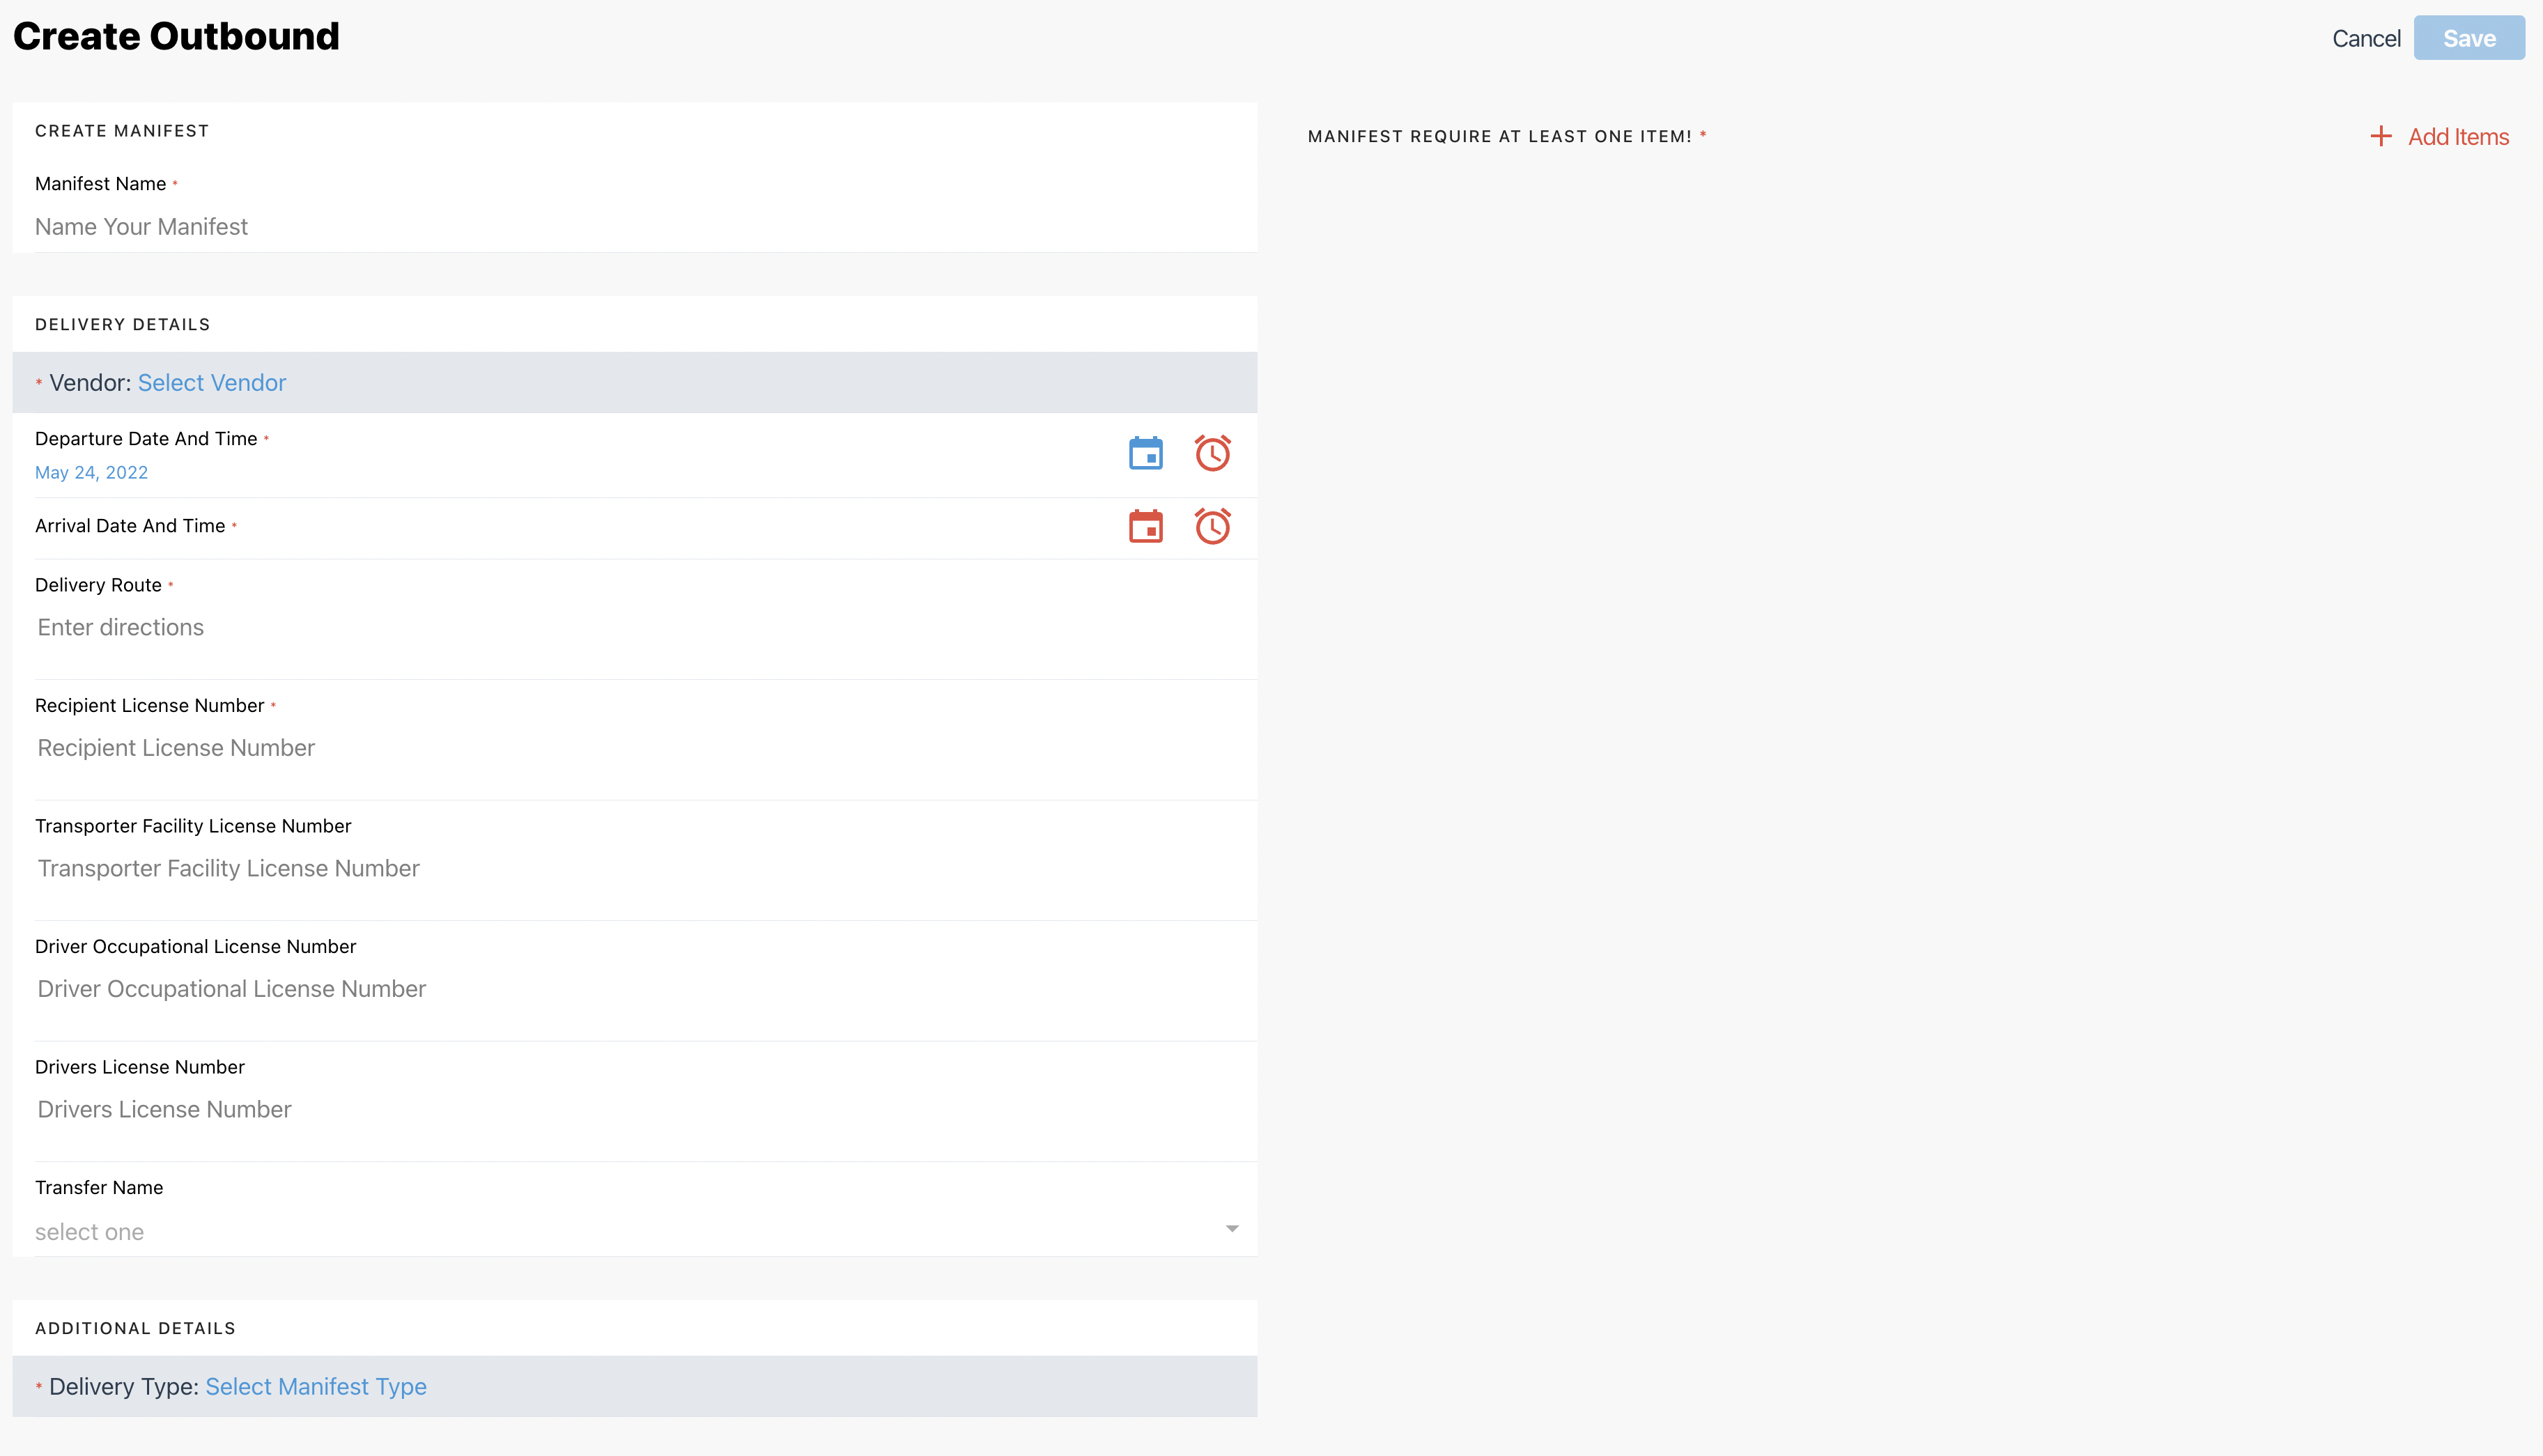
1. Log in to KlickTrack and navigate to Dashboard > Inventory Management > Outbound Manifests.
2. Click on the blue (➕) icon to pop a page with the outbound manifest form.

3. In the form, enter the necessary information for the transfer:
-
Enter a name for the manifest
-
Select the Vendor.
-
Select the delivery and arrival dates using the Calendar icon
-
Select the delivery and arrival times using the Alarm Clock
-
Enter the Delivery Route information.
-
Enter the Vendors license number
-
If you use a 3rd party transporter, enter the transport facility license number.
-
Enter the Delivery Driver's license information.
-
Select the Outbound Manifest type (this field is called "Transfer Name")
-
Select the Delivery Type and
-
Enter the necessary information into the fields associated with that delivery type.
4. Next, add the items you wish to transfer out by selecting the "+Add Items button" in the upper right corner of your screen.
5. Search for the item by barcode, and select the item you wish to add to the manifest.
6. Input the Item qty to be transferred out.
7. Repeat steps 6 & 7 for all items to be transferred out of the store.
8. Once all items are in the manifest, click the "Save" button. This will close the window and place your manifest in the appropriate status.
Next, you need to move over to Metrc to register your manifest.
You can do this by clicking the "Go to Metrc" button at the top of the KlickTrack dashboard or simply going to your Metrc account portal on your device.
9. Once you are in your Metrc account, select "Transfers" from the menu bar and choose "Templates" from the drop-down menu.
-
The outbound transfer you just created in KlickTrack will be visible in your templates.
-
Click the "Use" button on the desired template to open the manifest.

10. The information you entered and saved in the Klicktrack outbound manifest will already be populated in the manifest window. Your next step is to:
- Review all your information, including the package IDs, to confirm that everything is accurate.
- Click the "Register Transfer" button.
Your outbound manifest is now registered in Metrc and synced with KlickTrack.
- You can find and view your outbound manifest by going to KlickTrack Dashboard > Outbound Manifests and filtering to the appropriate manifest status (i.e., In Transit, Ready for Delivery, etc.).
- When the status of the outbound transfer updates in Metrc, it will trigger KlickTrack to update the manifest to the new status in our dashboard as well.
Option 2: New Package and Outbound Transfer creation
⚠ The steps outlined in this option are for anyone who is transferring out:
▪ A partial package with the intention to sell the rest of the package
▪ Packages that have historical sales associated with them
To transfer out these packages, you must first create a new package in Metrc and then create the transfer manifest. Steps for how to do so are below:
Step 1: Create a new package in Metrc
1. In Metrc, create a new item (or items if you have multiple packages you are transferring out) by going to Admin > Items > Add item.
2. Once you've created the new item (s), navigate to Packages > Active and click "New Package." This will pop a new package form.
3. In the new package form, enter in the necessary information, including:
-
New package ID tag (click the magnifying glass to choose an available ID)
-
Inventory location
-
Item Name (select the item created in Step 1)
-
Qty
-
Unit of Measure
4. On the right-hand side of the form, you will see the source package that you are creating this new package from. In the source package area, you will need to enter the qty you are removing from the source.
-
If you intend to send out the remaining package, you can select the "Finish the package" box.
5. Select "Create Package."
6. Repeat the steps above for all items you wish to transfer out of the store.
7. Once you have created all the packages you need, take the physical Metrc package tag(s) and attach them to the outgoing package carton(s). Your recipient cannot accept the transfer without the physical tags applied to the carton.
Your next step is to create the transfer manifest; see the note and instructions below.
▪ Option 1: Reach out to KlickTrack Customer Support and file a ticket to have your Metrc inventory synced with KlickTrack so that we can pull in the new item names and package ID's. If you go this route, you can follow the steps in Option 1 to create an outbound transfer manifest once your inventory has been synced.
OR
▪ Option 2: Create the outbound transfer in Metrc using the instructions below. This option is recommended if you intend to transfer out the inventory within the next 24 to 48 hours.
Step 2: Create an outbound transfer in Metrc.
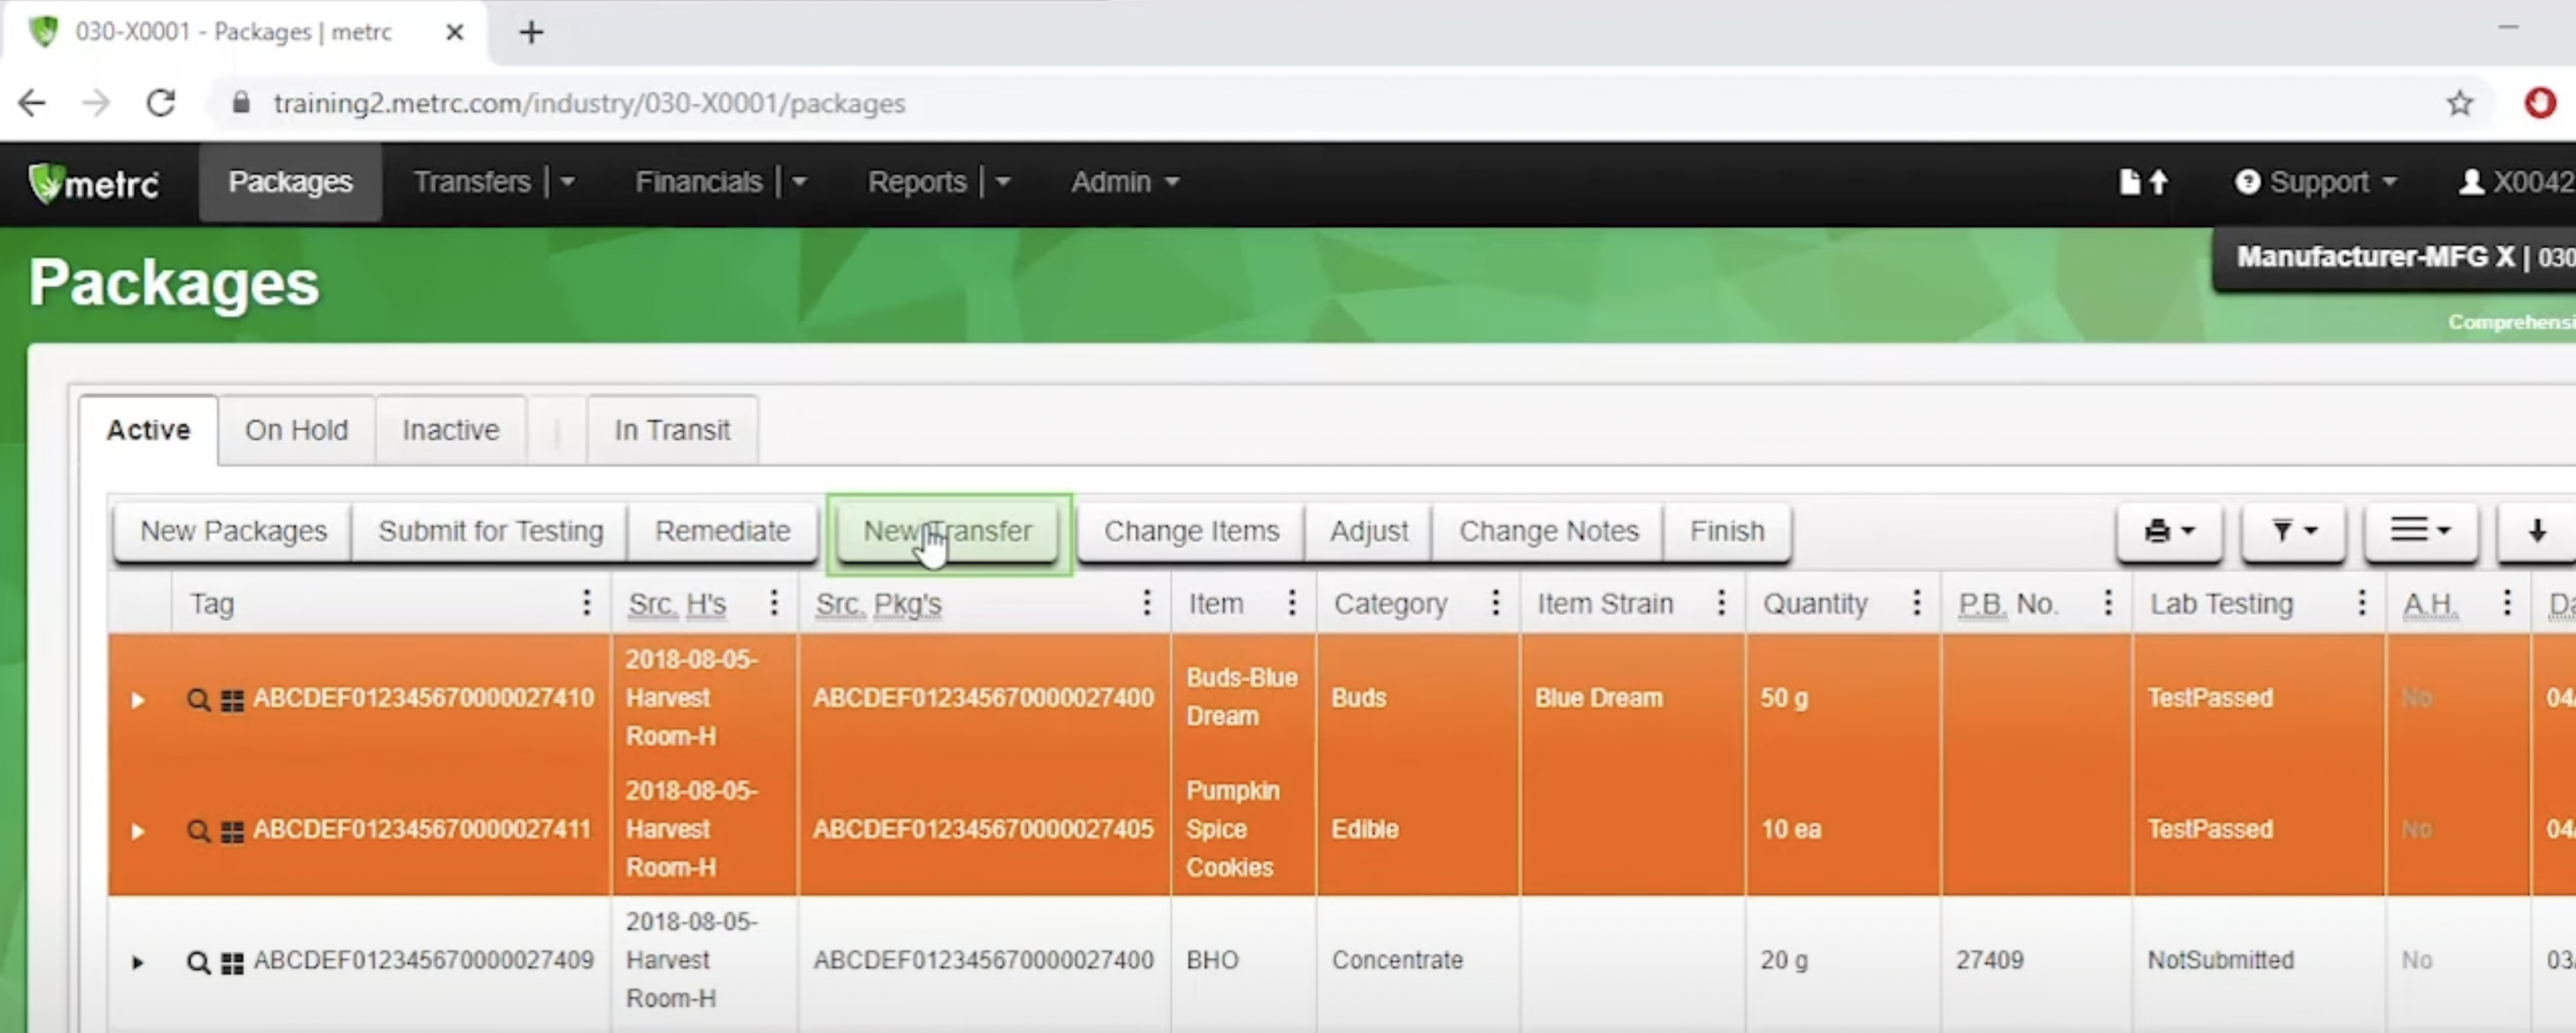
1. In Metrc, navigate to Packages > Active
2. Select the first package you wish to transfer out.
3. Hold down the Command (Mac users) or Control (PC users) key, and select the additional packages you wish to include in the transfer.
4. Click "New Transfer" to open the Transfer modal window.

5. Fill in all the required information in the Transfer modal, including:
-
Vendor
-
Transfer Type
-
Estimated departure and arrival
-
Planned route
-
Transporter
6. Click "Register Transfer." Once you have registered the transfer:
-
The packages you added to the transfer will be moved out of your "Active" package inventory
-
You can find your newly created transfer under Transfers > Outgoing
7. You can print your manifest by selecting it in Transfer > Outgoing and clicking the "View Manifest" button. In the full manifest screen view, you can either download the manifest or print it from the screen.
Step 3: Data sync with KlickTrack
Your final step will be to file a ticket with KlickTrack customer support to have your inventory data resynced so that we can update your data in the KlickTrack system to reflect the actions taken in Metrc.


